Cara Mempublikasikan WebApp React yang Anda Buat ke UltraStack ONE untuk React
InMotion Hosting’s UltraStack ONE for React provides a streamlined path for deploying React applications built with AI-powered development tools like Lovable. This guide will walk you through the complete process of connecting your Lovable project to GitHub and deploying it to your UltraStack ONE for React VPS.
Before You Get Started (Prerequisites and Considerations)
Before beginning this deployment process, ensure you have the following resources ready. For UltraStack ONE for React, you must contact us for the Beta prior to September:
- A completed React application built in Lovable
- A GitHub account with repository access
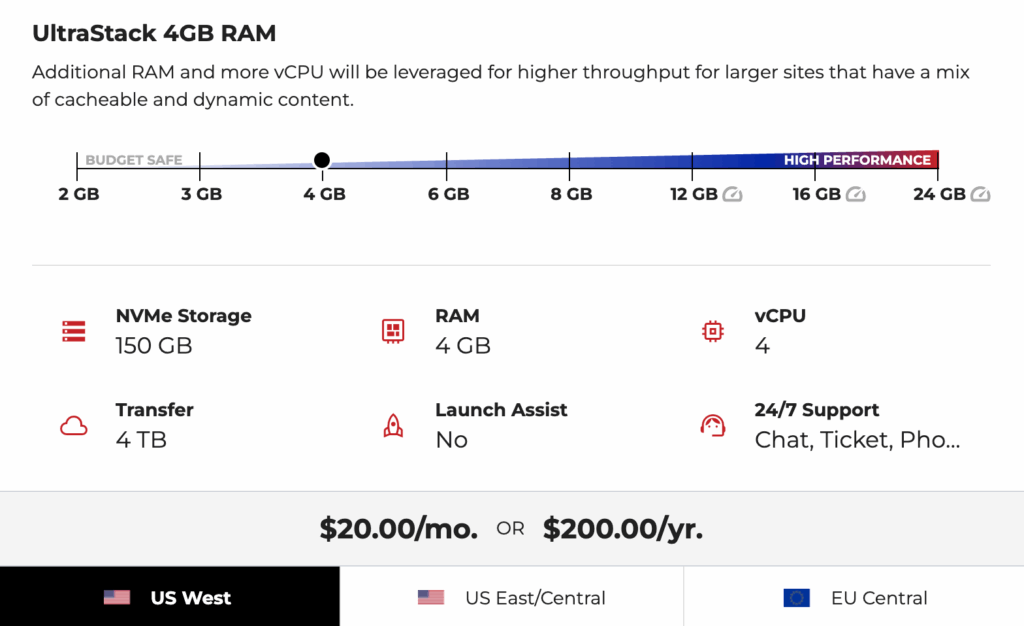
- An active UltraStack ONE for React VPS (2GB/2vCPU minimum for development, 4GB/4vCPU recommended for production)
- SSH access to your UltraStack ONE VPS
- Basic familiarity with command line operations
Important Note About UltraStack ONE for React Release
UltraStack ONE for React is scheduled to release in September 2025. This specialized VPS solution is purpose-built for React applications and includes pre-configured server software tailored specifically for React deployment workflows.
Understanding UltraStack ONE for React
UltraStack ONE for React is InMotion Hosting’s purpose-built Virtual Private Server running on our Highly Available NVMe-based cloud infrastructure. This VPS comes pre-configured with all the essential server software needed for React applications, including
npm for building applications and NGINX with optimized max_connections settings to serve your application efficiently.The server configuration includes proper URL routing to work seamlessly with React Router, eliminating common URL link headaches. Additionally, your VPS includes a stateful backend data storage solution powered by PostgreSQL, configured for high performance with connection pooling optimized for Node.js server applications handling inbound API calls from your frontend.
VPS Resource Recommendations
Your UltraStack ONE for React VPS capabilities scale with the allocated RAM and vCPUs. A 2GB/2vCPU VPS can support pretty serious traffic levels and provides an excellent starting point for development and testing environments. However, for production deployments, we recommend a 4GB/4vCPU configuration to ensure good performance under real-world traffic conditions.
Unlike traditional hosting solutions, UltraStack ONE for React excludes unnecessary software like Apache, focusing exclusively on the tools and services your React application needs. This approach reduces overhead and potential security vulnerabilities while maintaining top performance per dollar spent. Larger VPSes are still very reasonable so if it is a large scale use case, just get something in the 8GB/8vCPU or 12GB/12vCPU to start.
Step 1: Connecting Lovable to GitHub
The first step in your deployment journey involves establishing a connection between your Lovable project and GitHub. This integration provides version control, backup capabilities, and enables automated deployment workflows.
Initiating the GitHub Connection
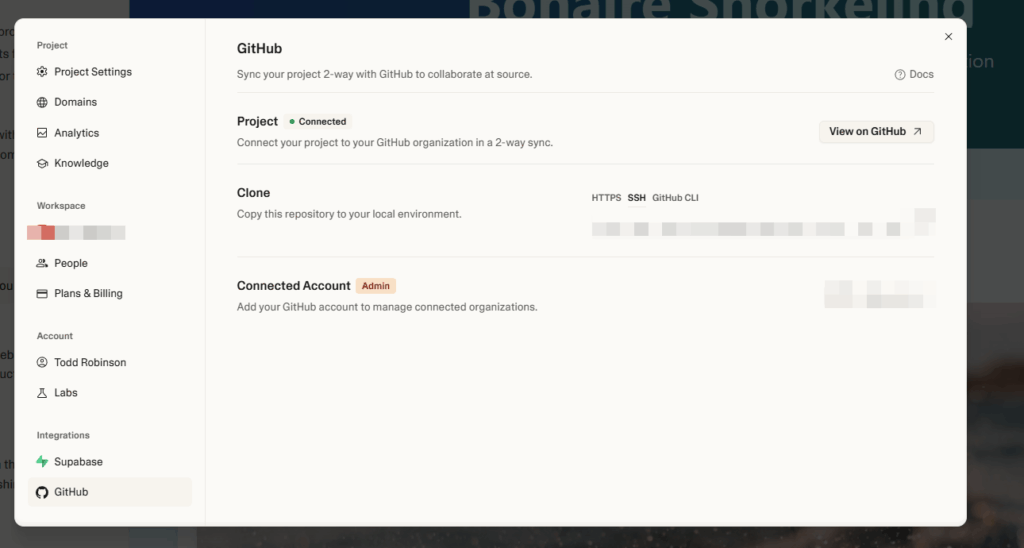
In the Lovable editor, click on GitHub → Connect to GitHub (usually found in the top-right corner of the project editor). This will begin the authorization process.
You’ll be redirected to GitHub to authorize the Lovable GitHub App. Sign in to GitHub if prompted. When asked to grant access, choose either All repositories or Only select repositories. For security purposes, you may prefer to grant access only to specific repositories, though allowing all repositories provides more flexibility for future projects.
Selecting Your GitHub Account
If your GitHub user belongs to organizations, you may need to confirm which GitHub account or organization to install the Lovable app to. You can create the project’s repo under your personal GitHub or any organization where you have permission.
Remember that you can only connect one GitHub account per Lovable account at a time. If you need to use an organization’s GitHub account, ensure you have admin access to allow repository creation.
Creating the Repository
Once GitHub is connected, return to your Lovable project. Click the Create Repository button (located in the top-right of the Lovable editor interface). Lovable will then create a new GitHub repository for this project and push the current project code to that repo.
This initial push may take a few seconds to complete. After this step, your Lovable project’s code will be accessible on GitHub, providing the foundation for your deployment workflow.
Verifying the Connection
Navigate to GitHub and go to your account (or org) – you should see the new repository with your project’s name. It will contain all the code of your Lovable app. In the Lovable editor, you should also see confirmation that the repository has been linked successfully.
Step 2: Understanding GitHub and Lovable Synchronization
Once connected, your Lovable project and GitHub repository maintain real-time synchronization. When you commit and push code to the default branch on GitHub, those commits will show up in Lovable almost automatically. Lovable’s integration listens for changes – whenever you push to GitHub, Lovable pulls the latest commit into the project.
Similarly, if you make changes in Lovable (for example, editing code via Lovable’s Dev Mode or having the AI generate new code), those changes are also saved to the Git repository backing your project. Lovable will push these commits to GitHub automatically, updating the repository.
This bidirectional synchronization ensures that your code remains consistent across both platforms without manual intervention.
Step 3: Accessing Your UltraStack ONE VPS via SSH
To deploy your React application, you’ll need SSH access to your UltraStack ONE VPS. When running a website or server, SSH can save you time by allowing you to view, manage, and edit files from the command line interface (CLI).
Generating and Adding SSH Keys
Generate and add the SSH Key to your server through InMotion Central. This process creates a secure authentication method that eliminates the need for password-based logins.

Connecting to Your Server
Log into InMotion Central, open your Project, then click Manage Environment. You can then copy your hostname or IP address to use to connect.

Here’s what it would look like to connect using either the hostname or IP address:
# Connect with hostname
sshroot@vps####.inmotionhosting.com

# Connect with IP address
ssh[email protected]
Replace the placeholder values with your actual server details provided in InMotion Central.
Step 4: Preparing Your UltraStack ONE VPS for React Deployment
Your UltraStack ONE for React VPS comes pre-configured with the necessary software stack, but you’ll need to prepare it for your specific application deployment.
Understanding the Pre-configured Environment
Your VPS includes
npm for building React applications and NGINX configured specifically for React applications. The NGINX configuration includes proper URL routing that works seamlessly with React Router, eliminating common single-page application deployment issues.Configuring NGINX for High API Connections
UltraStack ONE for React includes NGINX configured with high
max_connections settings to handle substantial API traffic. The default configuration is optimized for React applications that make frequent API calls to backend services.The NGINX configuration includes:
- Optimized worker processes and connections
- Proper proxy settings for API endpoints
- Static file serving optimization for React build assets
- Compression settings for improved performance
Accessing NGINX Configuration
Below is the location of your site’s NGINX configuration file. Be sure to replace vps#### with your actual VPS server number:
/etc/nginx/conf.d/vps####.inmotionhosting.com.confYou can view and modify this configuration file as needed for your specific application requirements.
Step 5: Understanding PostgreSQL and Node.js Connection Pooling
Your UltraStack ONE for React VPS includes PostgreSQL and a Node.js install configured with connection pooling for optimal performance. Understanding why connection pooling is crucial will help you build more efficient applications.
Why Connection Pooling Matters
Connecting a new client to the PostgreSQL server requires a handshake which can take 20-30 milliseconds. During this time passwords are negotiated, SSL may be established, and configuration information is shared with the client and server. Incurring this time delay every time we want to execute a query would substantially slow down our application.
Additionally, the PostgreSQL server can only handle a limited number of clients at a time. Depending on resources like available memory of your PostgreSQL server you may even crash the server if you connect too many clients.
Implementing Connection Pooling in Your Node.js Backend
Your UltraStack ONE for React VPS includes a recommended
node-postgres (thanks node-postgres!) implemented pre-configured connection pool. When building your backend API endpoints, use the pool pattern for database connections:importpgfrom'pg'
constPool=pg
constpool=newPool(
user:'your_database_user',
host:'localhost',
database:'your_database_name',
password:'your_database_password',
port:5432,
max:20,//Maximumnumberofconnections
idleTimeoutMillis:30000,
connectionTimeoutMillis:2000,
)
//Singlequerymethod (preferred formostcases)
constgetUserById=async (id) =>
constres=awaitpool.query('SELECT * FROM users WHERE id = $1', [id])
returnres.rows[0]
If you don’t need a transaction or you just need to run a single query, the pool has a convenience method to run a query on any available client in the pool. This is the preferred way to query with
node-postgres if you can as it removes the risk of leaking a client.Step 6: Setting Up GitHub Actions for Automated Deployment
UltraStack ONE for React specifically supports GitHub Actions for easy CI/CD pipelines. This automation will deploy your React application whenever you push changes to your main branch.
Creating the GitHub Actions Workflow
In your GitHub repository, create a
.github/workflows/deploy.yml file:name: Deploy to UltraStack ONE for React
on:
push:
branches: [ main ]
jobs:
deploy:
runs-on: ubuntu-latest
steps:
- uses: actions/checkout@v2
- name: Setup Node.js
uses: actions/setup-node@v2
with:
node-version: '18'
- name: Install dependencies
run: npm ci
- name: Build React application
run: npm run build
- name: Deploy to UltraStack ONE VPS
uses: appleboy/scp-action@master
with:
host: $ secrets.HOST
username: $ secrets.USERNAME
key: $ secrets.SSH_KEY
port: 22
source: "build/*"
target: "/var/www/html"
rm: trueConfiguring GitHub Secrets
In your GitHub repository settings, add the following secrets:
- HOST: Your UltraStack ONE VPS hostname or IP address
- USERNAME:
root(or your configured user) - SSH_KEY: Your private SSH key content
Step 7: Deploying Your React Application
Manual Deployment Process
For your initial deployment or when you need direct control, you can deploy manually:
- Clone your repository on the VPS:
cd/var/www
gitclonehttps://github.com/yourusername/your-repo.git
cdyour-repo- Install dependencies:
- Build your React application:
npmrunbuild- Copy build files to web directory:
cp-rbuild/*/var/www/html/- Restart NGINX:
systemctlrestartnginxAutomated Deployment via GitHub Actions
Once you’ve configured GitHub Actions, deployment becomes automatic. Simply push changes to your main branch, and the workflow will:
- Build your React application
- Transfer the build files to your VPS
- Update the web directory with new content
Step 8: Configuring Your Backend API
Your UltraStack ONE for React VPS includes Node.js and is configured to handle API requests. Create your backend API endpoints to serve your React application.
Sample API Structure
Create an
api directory in your project:// api/server.js
import express from'express'
import pg from'pg'
constPool= pg
constapp=express()
constport=3001
// Database connection pool
constpool=newPool(
user: 'postgres',
host: 'localhost',
database: 'your_app_db',
password: 'your_password',
port: 5432,
)
app.use(express.json())
// Sample API endpoint
app.get('/api/users', async (req, res) =>
try
constresult=await pool.query('SELECT * FROM users')
res.json(result.rows)
catch (err)
console.error(err)
res.status(500).json( error: 'Internal server error' )
)
app.listen(port, () =>
console.log(`API server running on port $port`)
)Managing Your Node.js API Service
Note the below may change prior to release!
You can manage your Node.js API service using
systemctl commands:# Start your API service
systemctlstartyour-api-service
# Stop your API service
systemctlstopyour-api-service
# Restart your API service
systemctlrestartyour-api-service
# Check service status
systemctlstatusyour-api-serviceStep 9: Testing Your Deployment
After deployment, verify your React application is working correctly:
- Access your application via your VPS hostname or IP address
- Test React Router functionality by navigating to different routes
- Verify API connectivity by checking that your frontend can communicate with your backend
- Monitor server logs to ensure no errors are occurring
Monitoring Application Performance
We expect to add more visual monitoring during the release or just after.
You can view various log files to monitor your application:
# View NGINX access logs
tail-f/var/log/nginx/access.log

# View NGINX error logs
tail-f/var/log/nginx/error.log

# View your application logs
tail-f/var/log/your-app/app.log
Step 10: Ongoing Maintenance and Updates
Updating Your Application
With GitHub Actions configured, updates are streamlined:
- Make changes in Lovable or directly in your GitHub repository
- Push changes to the main branch
- GitHub Actions automatically builds and deploys the updated version
Database Management
Your PostgreSQL database requires periodic maintenance:
- Monitor connection pool usage
- Optimize queries for better performance
- Regular backup procedures
- Update database schema as your application evolves
Security Considerations
Maintain security best practices:
- Keep your SSH keys secure
- Regularly update your GitHub secrets
- Monitor access logs for suspicious activity
- Keep your VPS software updated
Troubleshooting Common Issues
Build Failures
If your React build fails:
- Check that all dependencies are properly listed in package.json
- Verify that your build scripts are correctly configured
- Review GitHub Actions logs for specific error messages
Connection Issues
If you experience database connection problems:
- Verify your connection pool configuration
- Check that PostgreSQL is running: systemctl status postgresql
- Review database logs for connection errors
NGINX Configuration Problems
If your React Router isn’t working properly:
- Verify that your NGINX configuration includes proper fallback rules
- Check that your build files are in the correct directory
- Restart NGINX after configuration changes
Conclusion
Deploying your Lovable-created React application to UltraStack ONE for React provides a powerful, scalable foundation for your web application. The combination of Lovable’s AI-powered development capabilities, GitHub’s version control and automation features, and InMotion Hosting’s optimized React hosting environment creates an efficient development and deployment workflow.
Your UltraStack ONE for React VPS provides all the necessary infrastructure components, from the optimized NGINX configuration to the PostgreSQL database with connection pooling. This specialized hosting solution eliminates common deployment challenges while providing the performance and scalability your React application needs.
By following this guide, you’ve established a professional deployment pipeline that supports both rapid development through Lovable and reliable production hosting through UltraStack ONE for React. This foundation will serve your project well as it grows and evolves.
Remember that UltraStack ONE for React is specifically designed to support React applications, providing the exact server configuration and software stack your application needs without unnecessary overhead. This focused approach delivers optimal performance while simplifying the deployment and maintenance process.
With your deployment pipeline in place, you can focus on building great user experiences with Lovable while having confidence in your application’s hosting foundation. The automated deployment process ensures that your latest changes are always reflected in your production environment, enabling rapid iteration and continuous improvement.
source
Comments
Post a Comment